Posts

Showing posts from 2013

Adding portlet in control panel

Image
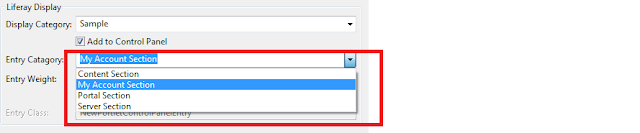
Open the liferay-portal.xml and add the following these 2 entries.     1. <control-panel-entry-category>content </control-panel-entry-category>(Mandatory)     2. <control-panel-entry-weight>2.0 </control-panel-entry-weight>(Mandatory)     3.<control-panel-entry-class>  your-custom-class </control-panel-entry-class>(Optional) 1. Category is nothing but that which section your portlet should be appear in the control panel. If you see   the below screen shot it shows 4 options       my,content,portal,server 2. Low value it appears higher in the section 3. It is optional , If you didn't specify this entry it will take default class which defined in the portal.properties     #     # Set the name of a class that implements     # com.liferay.portlet.ControlPanelEntry. This class denotes the default     # value of of the element "control-panel-entry-class" in liferay-portlet.xml     # and is called by the Control Panel to dec

Calling service classes in from webcontent

Follwing URL gives what are the variables can be access in the CMS template. http://www.liferay.com/community/wiki/-/wiki/Main/CMS+Internal+API http://www.liferay.com/es/community/wiki/-/wiki/Main/Access+Objects+from+Velocity http://www.liferay.com/web/raymond.auge/blog/-/blogs/custom-velocity-tools-and-liferay-6-0 If we see the  $request output, it gives manythings. Some it requires to access the services from the custom portlet . We need to add property in portal-ext.properties .  If we find the "journal.template.velocity.restricted.variables" it contains key value as serviceLocator. Whenever we are adding the property in a file we need to remove the "serviceLocator" form below  and add it as below.     #     # Input a comma delimited list of variables which are restricted from the     # context in Velocity based Journal templates.     #     journal.template.velocity.restricted.variables= After restarting the server we can acce

Embedding portlet in a webcontent

We can embed portlet in a web content by using the following tag   <runtime-portlet name ="33"></runtime-portlet>  // here we are embedding the blogs portlet 1.Create the web content by selecting the basic web content .      Enter the title and when entering the content click on the source of the CKEditor and place the above tag in the editor.     Click on the Save button.       Place the web content display portlet in the  portal . select the appropriate web content . Then you see the Blogs portlet added in the web content.

Internationalization for custom portlet in liferay

Here  the following points are to define Internationalization in custom portlet      1. Create <resource-bundle>content/Language</resource-bundle> in portlet .xml before supports tag.      2. Create folder content in docroot/WEB-INF/src path and create Language.properties  file in content folder.       3. write the entries in the Language.properties file or language_fr.properties file as                 search-title = Search Title       4. In our JSP add the liferay tag  to detect the property.                  <liferay-ui:message key="search-title"/>           Also you can use LanguageUtil Utilty class to get entries

Creating Filter in custom portlet

Here we will do how access the portlet filter. These portlet filter which introduced in JSR-286. We will go through the how to create filter in customportlet. STEP:1 Here i am create the portlet filter when an action takes place i.e whenever there is an Action Request. Create the class the " ActionJSONFilter " which implements " ActionFilter " public class ActionJSONFilter implements ActionFilter Also we can implement the RenderFilter also ResourceFilter . All these are in the javax.portlet.filter.*; package. public class ActionJSONFilter implements ActionFilter { public void destroy() { System.out.println("destroy"); } public void init(FilterConfig arg0) throws PortletException { System.out.println("init"); } public void doFilter(ActionRequest arg0, ActionResponse arg1, FilterChain arg2) throws IOException, PortletException { System.out.println("doFilter"); } } STEP:2  Define the below e

Obtaining DB Connection

We can get the DB Connection by using the DATA ACCESS class. If we look into this class . It Contains many methods. 1. getConnection() 2. getConnection(String location) 1.cleanUp(Connection connection) 2.cleanUp(Connection connection, Statement statement) By Using these methods we can get Connection and we can cleanup connection. Connection Con = DataAccess.getConnection(); --------- --------- DataAccess.cleanUp(con);

Generating Stubs(webservices) in Liferay

Generating stubs in liferay , 1. we can generate the stubs in eclipse as         File ---> New ---> Others --->type webservices and select webservices client ---> Paste the WSDL in the service defination and move the slide till to TestClient and click on the "finish" to generate. WSDL can of type below http://localhost:8080/api/axis/Portlet_Blogs_BlogsEntryService?wsdl When i am trying to do in liferay eclipse it is not allowing to generate the stubs. So i am used Plain tomcat to generate the stubs. 2. We can also generate the stubs by ant    Drag and Drop the build.xml in ant    Locate the build-client . Double click on it . It Generate the <portlet-name>-portlet-client.jar file in the docroot/WEB-INF/client folder.      This lib contains the stubs. By Using that stubs we can write the our own implementations.

Accesing the webservices using REST

Here i am trying to delete the blogsEntry. Here is the sample code for the REST based application    String uri = "http://localhost:8080/api/secure/jsonws/blogsentry/delete-entry";      String userName="test@liferay.com";    String password = "test";      Credentials credentials = new UsernamePasswordCredentials(userName, password);      HttpClient client = new HttpClient();    client.getState().setCredentials(AuthScope.ANY, credentials);    client.getParams().setParameter("http.useragent", "Test Client");    client.getParams().setAuthenticationPreemptive(true);        PostMethod postMethod = new PostMethod(uri);    postMethod.addParameter("entryId", "10101") ;      int returnCode = 0;    try {     returnCode = client.executeMethod(postMethod); } catch (IOException e) { e.printStackTrace(); }

Order by Comparator

Whenever we create finder method by default it generates many methods associating with it starts by method name as  findBy ..... Sometimes it may requires you to display the results in the ASC/DESC. So we have one method which accepts OrderByComparator as parameter. Below example explains you how to retrieve the Title in the Ascending order. OrderByComparator comparator = OrderByComparatorFactoryUtil.create(TestModelImpl.TABLE_NAME, "title", orderByType.equals("asc")) jsonTestEntryPersistance.findByTitle("name",comparator);

Default Request parameters in actionRequest

In Liferay, Apart from the request parameter values it gives 2 more additional parameters.  1.formDate    -   Date  2.javax.portlet.action - Method you have called. We can retrieve the parameters from the actionRequest as  ParamUtil.getString(actionRequest, "title");  I have seen the parameters from the below code as follows  Map<String, String[]> requestMap = actionRequest.getParameterMap();                                 Set<Entry<String, String[]>> set = requestMap.entrySet();            Iterator<Entry<String, String[]>> it = set.iterator();                      while (it.hasNext()) {             Map.Entry<String, String[]> entry = (Entry<String, String[]>) it.next();                         System.out.println("entry ===="+entry.getKey());                         String[] paramValues = entry.getValue();                for (int i = 0; i < paramValues.length; i++) {              

Removing prefix value for table created by service builder

In Liferay , Whenever we are writing the service bulider we specify the "namespace" in  service.xml so that table will be created as prefix namespace. If you look into the below service.xml , In DB it creates as test_library . <service-builder package-path="com.test"> <author>BNG</author> <namespace>test</namespace> <entity name=" library " local-service="true" remote-service="false"> <column name="libraryId" type="long" primary="true" />    ----------------    </entity> </service-builder>  If you want to remove the prefix while creating the table in DB. we need to keep auto-namespace-tables = "false". <service-builder package-path="com.test" auto-namespace-tables="false" > Thats it!!!

Avoiding Multiple Submits(Refresh page) in Liferay

We often see after submitting the form and refresh the page you will see the same result will be adding in the DB. So how to get rid of this? Here we have 2 options to eliminate this behaviour. 1. By Declaring the tag in the liferay-portlet.xml after <icon> tag           <action-url-redirect> true </action-url-redirect> 2.After doing our logic we can redirect to specified URL by using actionResponse.    actionResponse.sendRedirect(PortalUtil.getLayoutURL(themeDisplay.getLayout(),themeDisplay));   Here we are  redirecting to the friendly url of that page. The above will be redirect to the below URL as                     //group/test/test1----- (group/<your-community-name>/pageName) .

How Liferay is identifying the browser and device

Image
In this article we can know how liferay is identifying the browser and device. Press Ctrl_Shift+J to see the elements. Look into the javascript it shows weather It is an Chrome or Firfox or IE or Iphone etc..     Open the top_js.jspf file we have find the following snipetts.     isChrome: function() { return <%= BrowserSnifferUtil.isChrome(request) %>; }, isFirefox: function() { return <%= BrowserSnifferUtil.isFirefox(request) %>; }, isGecko: function() { return <%= BrowserSnifferUtil.isGecko(request) %>; }, isIe: function() { return <%= BrowserSnifferUtil.isIe(request) %>; }, isIphone: function() { return <%= BrowserSnifferUtil.isIphone(request) %>; }, In JavaScript:                    Browser:                   Liferay.Browser.isIe()         // returns true or false                   Liferay.Browser.isMozilla() // returns true or false In VM file:   In

Form Validation In Liferay -- Client Side validation

In Liferay we can do client side validation very easily.  We use <aui:validator>  tag to do validations. It allows "name" and "errormessage" attributes Names it allows are: alpha alphanum date digits email equalTo number acceptFiles min minLength max maxLength range rangeLength required url custom Here custom is use to give custom validations , Below Exampleis the custom validation for email validation .In Liferay for email sometimes its is not working. So i am writing the custom validation.  Just Copy & paste the code and try it will perfectly works <aui:validator name=" custom " errorMessage="Please enter valid email address">       function (val, fieldNode, ruleValue) {           var result = false;         var emailRegexStr = /^[a-zA-Z0-9._-]+@[a-zA-Z0-9.-]+\.[a-zA-Z]{2,4}$/;         var isvalid = emailRegexStr.test(val); if (isvalid) {  result = true;

Creating URL in Javascript in Liferay

Sometimes it may requires to create URL in Javascript. In Liferay we can create any URL in Javascript.  In Normal Case we can create Action URL as            < portlet:actionURL var="testURL" name="update" /> In Javascript we create as           <aui:script>            AUI().ready('liferay-portlet-url', function(A){           var actionURL = Liferay.PortletURL. createActionURL ();          actionURL .setParameter("cmd", "test");            });          </aui:script>    To create renderURL we put as Liferay.PortletURL. createRenderURL() ; in above script.    To Create resourceURL we put as Liferay.PortletURL. createResourceURL() ; Refer "LiferayPortletURL" interface to get more idea. Apart from the setting the parameter(setParameter) to the URL we can have setPlid("----") , setWindowState("----"); also.

Relation between Tag cloud and Blogs in liferay

If we place tagcloud and blogs portlet in one page .When we click on the tagcloud automatically blogs portlet is rendering the tagged entries. So, how does it works? Open the portlet-custom.xml search with the "148" here 148 refers to portlet name.  At end of the portlet tag you will find the " <supported-public-render-parameter>tag</supported-public-render-parameter> ". Also search with "33" none other than blogs portlet. You will find the following line "<supported-public-render-parameter>tag</supported-public-render-parameter> ". Then how does it works in blogs?  Open the view.jsp(html/portlet/blogs folder). you will find the below line              String assetTagName = ParamUtil.getString(request, "tag");  where it is retrieving the tagname when we click on the tag. Following lines will do lot of things for retrieving the entries.     AssetEntryQuery assetEntryQuery = new AssetEntryQuery(B

Accessing SOAP and JSON webservices(WSDL)

JSON webservice          http://localhost:8080/api/jsonws Axis Webservice       http://localhost:8080/api/axis Custom Portlet JSON webservices    http://localhost:8080/test-JSON-portlet/api/jsonws Custom Portlet AXIS webservices      http://localhost:8080/test-JSON-portlet/api/axis

Search Container in liferay

List<Article> articles= ArticleLocalServiceUtil.getArticles(0, -1); <liferay-ui:search-container delta="4" emptyResultsMessage="Sorry. There are no items to display." iteratorURL="<%= iteratorURL %>"> <liferay-ui:search-container-results  total="<%= articles size() %>" results="<%= ListUtil.subList(articles, searchContainer.getStart(), searchContainer.getEnd()) %>"/> <liferay-ui:search-container-row modelVar="article" className="Article"> <% articleDetailsURL.setParameter("articleId", Long.toString(article.getArticleId())); %> <liferay-ui:search-container-column-text name="Article Title" property="articleTitle" href="<%= articleDetailsURL.toString() %>" /> <liferay-ui:search-container-column-text name="Desc" property="description" /> <liferay-ui:search-container

Redirecting user default landing page in liferay

Define "Default Landing Page" in Control Panel ---> Portal setting  and put below logic in your class String defaultPagePath = PrefsPropsUtil.getString(themeDisplay.getCompanyId(),  PropsKeys.DEFAULT_LANDING_PAGE_PATH); response.sendRedirect(defaultPagePath); The above redirtects to the page where you have defined the value in the portal setting.

Adding CK Editor in Liferay

<form>                             <table>                                <tr>                                    <td>                                      <aui:field-wrapper label="Editor">                                         <liferay-ui:input-editor editorImpl=" <%= EDITOR_WYSIWYG_IMPL_KEY %>" />                                         <aui:input name="dynamicContent" id="dynamicContent" type="hidden" />                                      </aui:field-wrapper>                                    </td>                                </tr>                            </table> <input type="submit"  value="Save" onclick="<%= renderResponse.getNamespace() %>save();"/> <%! public static final String EDITOR_WYSIWYG_IMPL_KEY = "editor.wysiwyg.portal-    web.docroot.html.portlet.blogs.edit_entry.jsp&

Encryption and Decryption In Liferay

In Liferay , you can encrypt and decrypt  the senstive data. Liferay has provided easy way to encrypt the data. Have a look at the  Encryptor class , we find the methods to encrypt and decrypt the data. Here is an example of encryption of data. private String encrptData(ActionRequest actionRequest,String data ) throws PortalException, SystemException, EncryptorException{ ThemeDisplay themeDisplay = (ThemeDisplay) actionRequest. getAttribute(WebKeys.THEME_DISPLAY); Company company = CompanyLocalServiceUtil.getCompany(themeDisplay.getCompanyId()); Key key = company.getKeyObj(); return Encryptor.encrypt(key, data); } The same string we can decrypt the following line as ,                   Encryptor.decrypt(key, data); So we may have an doubt which encryption algorithm liferay is using go to the portal.properties look at the following 2 properties.  company.encryption.algorithm=DES   company.encryption.key.size=56

Recovering the admin password in liferay

If you forgot the admin password, don't worry if you rights to access the DB , you can execute the below query to set admin password as "test". UPDATE User_ SET password_='qUqP5cyxm6YcTAhz05Hph5gvu9M=' WHERE emailAddress='test@liferay.com'; "qUqP5cyxm6YcTAhz05Hph5gvu9M=" is an encrypted form of "Test". EmailAddress can be your admin email address . In liferay by default it is an "test@liferay.com".

JavaScript Console in liferay

We can enable javascript console  in liferay. Add the following parameters in portal-ext.properties.     #     # Set this to true to enable the display of JavaScript logging.     #           javascript.log.enabled=true After adding parameter and restarting the server at the bottom you can see the console

Disabling cache in liferay

    ##     ## Browser Cache     ##     #     # Set this to true if you want the portal to force the browser cache to be     # disabled. It will only disable the cache for the rendered HTML response     # It will not have an impact on static content or other resources.     #     #browser.cache.disabled=true Add above parameter in portal-ext.properties .The above parameter ensures browser never cache the results. What liferay is doing internally to disable cache? Here we go, Have look at the ServicePreAction class , this ServicePreAction class excutes for every request if (PropsValues.BROWSER_CACHE_DISABLED ||(PropsValues.BROWSER_CACHE_SIGNED_IN_DISABLED && signedIn)) {                 response.setDateHeader(HttpHeaders.EXPIRES, 0);                 response.setHeader(HttpHeaders.CACHE_CONTROL,                                HttpHeaders.CACHE_CONTROL_NO_CACHE_VALUE);                 response.setHeader( HttpHeaders.PRAGMA,                             HttpH

Impersonation in liferay --- adding additional parameter (doAsUserId)

Liferay has great functionality of impersonation. Admin can impersonate any user and can see weather user can able to see the content. So if we develop the custom portlet we should ensure impersonation should work. So for your portlet when you create URL manually . Call portalUtil.addReservedParameter(URL , themedisplay); This method takes care of the weather to add  addtional parameter to the URL.

Adding Cookies in Java/Liferay

In Liferay , when user is logging into ,he/she can remember username . so that whenever user again  tries to login no need to enter his crenditinals. Following are things liferay is doing to add username in cookie in LoginUtil.java Cookie loginCookie = new Cookie(CookieKeys.LOGIN, login); if (Validator.isNotNull(domain)) {    // Here domain is "www.liferay.com" loginCookie .setDomain(domain); } loginCookie .setMaxAge(loginMaxAge);  // Age of the Cookie loginCookie .setPath(StringPool.SLASH);    CookieKeys.addCookie(request, response, loginCookie , secure);

Information about the service builder(service.xml) - data is deleted whenever we are deploying the portlet in liferay

Whenever we are writing the service.xml , we must be ensure the following condition <column name="frameworkVersionId" type="long" primary="true" id-type="increment" /> Dont use  id-type="increment" in cluster environment because when ever you are deploying the portlet data will be deleted and as it will be as new table. Ensure whenever your writing the  id-type="increment" for the primary key generation.

Many-to-Many relationship in liferay using service builder

Not only one-many relationship , we can also define many-to-many relationship using service builder If the entity and mapping-key attributes are specified and mapping-table is not, then the Service Builder will assume you are specifying a one to many relationship. For example: <column name="shoppingItemPrices" type="Collection" entity="ShoppingItemPrice" mapping-key="itemId" /> If the entity and mapping-table attributes are specified and mapping-key is not, then the Service Builder will assume you are specifying a many to many relationship. For example: <column name="roles" type="Collection" entity="Role" mapping-table="Groups_Roles" /> The above items are mentioned in DTD of service.xml , Download the DTD for more details.

One to Many Relationship in liferay using service bulider

Sometimes It is required to set relationship in liferay through the service.xml  <entity name="Parent" local-service="true" remote-service="false"> <column name="ParentId" type="long" primary="true" />                  <column name="childReference" type="Collection" entity="ChildReference" mapping-key="ChildId" />                -------------------               ------------------- </entity>  <entity name="Child" local-service="true" remote-service="false"> <column name="ChildId" type="long" primary="true" />                -------------------               ------------------- </entity> Thats it you have set one-to-many relationship Then build your service , to see the auto generated classes Refer the ParentUtil class to see the mapping classes .

Setting Page title in liferay

  Hi,   Some it requires to set page title , this following sniptess will be useful  HttpServletRequest request= PortalUtil.getOriginalServletRequest(PortalUtil.getHttpServletRequest(renderRequest));   PortalUtil.setPageTitle("Home - Page",request); Interally liferay using following snipets to set Page title in PortalImpl class public void addPageTitle(String title, HttpServletRequest request) { String requestTitle = (String)request.getAttribute(WebKeys.PAGE_TITLE); if (requestTitle != null) { title = requestTitle + StringPool.SPACE + title; } request.setAttribute(WebKeys.PAGE_TITLE, title); }   

Dynamic Query power in liferay

Navigate to the following URL to know how the dynamic query works, it clearly explains. http://liferayjavafunwithjay.blogspot.in/2012/01/power-of-dynamic-query-in-liferay.html Lately I came across a scenario while developing portlet in Liferay in which simple queries were not enough & I was required to fetch data on many different conditions. To simply the things, consider following scenario: There is one model (In Liferay's terms Entity / POJO) called "Request" generated by service builder having fields like request Id, status, requestor Id, department, shipment address, date, updator Id, next Approver Id etc. Now at run-time, I was required to show data by combining various conditions based on user’s actions like when ((requestorId == 1000 || nextApproverId == 1000) && (status == “PENDING”) ) ((address ==”NJ”)  &&  (status == “PENDING” || status == “NEW” || status == “INPROCESS”) )       In above 2 conditions mentioned in pseudo code,

Disabling the cache for entity and also finder

 In Liferay sometimes its need to disable cache, here it is how its works,  Suppose if we need to disable cache for BlogsEntry entity  Put following properties in portal-ext.properties     1.value.object.entity.cache.enabled.com.liferay.portlet.blogs.model.BlogsEntry = false;         For clarity look at the class" BlogsEntryModelImpl.java "         Similarly we can disable cache for finder of blogsEntry is as ,    2. value.object.finder.cache.enabled.com.liferay.portlet.blogs.model.BlogsEntry = false;

Inserting Objects in *.ServiceImpl.java

  By default liferay provides some objects injected. 1. counterLocalService 2. userLocalService     userService     userPersistance 3. resourceLocalService     resourceService     resourcePersistance       and etc....  So we inject other services by using reference tag in service.xml         <reference package-path="com.liferay.portlet.asset" entity="AssetEntry" /> Here we are inserting assetEntryLocalService

Refreshing the portlet through the javascript

Some times it may require our portlet when some action performed. We can refresh liferay portlet through the javascript. <script type="text/javascript"> jQuery(document).ready(function() {           Liferay.Portlet.refresh('#p_p_id_ testjson_WAR_testjson _'); } </script> Bold word is the portlet name

Creation of URL in class

Some times it may require you to create url in class. Its quite easy task to do , Here you follow as , ThemeDisplay themeDisplay = (ThemeDisplay) actionRequest. getAttribute(WebKeys.THEME_DISPLAY); long plid = PortalUtil.getPlidFromPortletId(themeDisplay.getScopeGroupId(),<portlet-name>);          PortletURL portletURL = PortletURLFactoryUtil.create(actionRequest ,<portlet-name>, plid ,PortletRequest.RENDER_PHASE);          portletURL.setWindowState(LiferayWindowState.POP_UP);          portletURL.setPortletMode(LiferayPortletMode.VIEW);          portletURL.setProperty("portletName", <portlet-name>);          portletURL.setParameter("type", "add"); For Custom portlet name will be some thing as like this <name>_WAR_<name>

Hiding the portlet

In some seceniros you may need to hide the portlet, In liferay it is easy as just add the attribute. renderRequest.setAttribute(WebKeys.PORTLET_CONFIGURATOR_VISIBILITY, false); That it !!! Above renderRequest  will set  in hiding 

Accessing JSON through javascript in custom portlet

Image
Scenrio:           Accessing the other custom portlet JSON services in our custom portlet through the javascript. Step:1 Enable remote-servie = true in service.xml as shown and build service to generate the services <service-builder package-path="com.liferay.testjson"> <namespace>custom</namespace>          <entity name="jsontest" remote-service="true" local-service="true" uuid="true">                      <column name="id" type="int" primary="true" />                       <column name="name" type="String"></column>                     <column name="desc" type="String"></column>     </entity>   </service-builder> Step2:   Open the class XXXXServiceImpl.class and write a method that you want to access in other portlet.   Here i have written getUsers method to reteive the cou

Focusing the form field in Liferay

  Whenever we create from in liferay ,it is required cursor to focus on the first field.   Suppose we can have form like this   <aui:from name="fm" method="post" action="${updateActionURL}">             <aui:input  name="title" label = "Title"/>        <aui:input  name="desc" label = "Desc"/>       <aui:button type="submit" value ="save"/> <.aui:form>  If we think title should be highlited on page load , following script is also required. <aui:script> Liferay.Util.focusFormField(document.<portlet:namespace/>fm.<portlet:namespace/>title); </aui:script> Deploy your project and refresh your page . We can see the first field is highlighted. These source are avaliable in the follwing path.       portal-web/docroot/html/js/liferay

Success message and Error message in liferay

Success Message                   In Class                           SessionMessages.add(request, "record-updated");                In JSP                           <liferay-ui:success key="record-updated" message="record-updated-sucessfully" />                Language.properties                            record-updated  = Your record updated successfully.            and also don't forget add following tag in portlet.xml after supports tag                           <resource-bundle>content/Language</resource-bundle>  Error Message            In Class                   SessionErrors.add(request,"cannot-delete-record");                In JSP                 <liferay-ui:error key="cannot-delete-record">                            <liferay-ui:message key=cannot-delete-this -record" />                </liferay-ui:error>                Language.properties          

Submitting the form with ajax(using alloy UI) i.e with out page refresh

    In rare it may happens, you have to submit the form with out refresh the page (actionURL ) and save the parameters in the DB.    Jus Copy the below code , Here i am using alloy UI to submit the form and here not need to append any parametrs to the URL .you will get the parameters values from request parameters. <portlet:actionURL var="formsubmissionURL" /> <aui:script use="aui-io-request,aui-node" > Liferay.provide(window,'submitForm', function() { var A = AUI(); A.io.request('${formsubmissionURL}',{ method: 'POST', form: { id: '<portlet:namespace />fm' }, on: { success: function(){     }   }   });   }); </aui:script > <aui:form action="#" method="POST" id="fm" name="fm" >      <aui:input type="text" name="name"/>      <aui:button type="submit" value="Save" /&

Sending mail in liferay

 In most of your project you may come across sending an mail to the user when ever updated. In liferay its pretty easy to do with that        InternetAddress fromAddress = new InternetAddress(user.getEmailAddress()) // from address         InternetAddress toAddress = new InternetAddress(user.getEmailAddress())  // to address             String body = ContentUtil.get("/templates/sample.tmpl", true);  // email body , here we are getting email structure creating the content folder in the src and create the file with the extension as tmpl . Here i have created a folder called content and also created file as sample.tmpl             String subject = "subject" // email subject                         body = StringUtil.replace(body, new String []{"[$NAME$]","[$DESC$]"}, new String []{"Name","Description"}); // replacing the body with our content.             MailMessage mailMessage = new MailMessage();             m

Creating scheduler in Liferay

  To create scheduler in liferay is easy just adding an entry in liferay-portal.xml and adding your custom logic in do receive method. 1.Add the following entry in liferay-portlet.xml after icon tag and before instansable tag.    " <scheduler-description> " tag you can give your custom description   " <scheduler-event-listener-class> " tag write your custom class where you write your custom scheduler  logic. " cron trigger class " tag , it identifies at what scheduler runs , here scheduler runs at 12 clock at sunday.             <scheduler-entry>            <scheduler-description>scheduler entry</scheduler-description>              <scheduler-event-listener-class>                 com.sample.scheduler.SchedulerClass             </scheduler-event-listener-class>            <trigger>               <cron>                 <cron-trigger-value>0 0 12 ? * SUN *</cron-trigger-value&

Hiding or Disabling the default sucess message

 By default in liferay, Whenever you submit form you will have default message as " Your request is proceed Successfully " How to disable it? There are 2 steps Step 1:    Just add below in portlet.xml before "excripation-cache" add-process-action-success-action false Step 2: Add the below code in the class level of a method SessionMessages.add(portletRequest,PortalUtil.getPortletId(portletRequest) +SessionMessages.KEY_SUFFIX_HIDE_DEFAULT_SUCCESS_MESSAGE); For Reference look into the PortletAction class of hideDefaultSuccessMessage method

Parsing in Liferay(Using SAX Parser reader)

  Liferay provided default classes to parse the xml content.   Have look at this SAXReaderUtil  which will be useful to parse the xml.   For Example:     Consider the WebContent(Journal article) where we have added metadata ,consider to fetch it.    First of all this metadata content will be store in Journal article table of Content column as <?xml version="1.0"?> <root available-locales="en_US" default-locale="en_US">    <dynamic-element instance-id="trtrtrt454" name="Title" type="text" index-type="">         <dynamic-content><![CDATA[Test Title]]></dynamic-content>     </dynamic-element>         <dynamic-element instance-id="Adgbcd456" name="Desc" type="text" index-type="">         <dynamic-content><![CDATA[Test Desc]]></dynamic-content>     </dynamic-element>     </root>

service bulider(service.xml) column types

When ever your are writing the service.xml , you may have doubts what type the liferay supports. Here we go,   Take look at the servicebulider class and method getSqlType(-,-,-) . So whenever you have to define data Type have a glance at this class.  Refer the " com.liferay.portal.tools.servicebuilder.dependencies " package what columns , Tables will allowed to add in the service.xml. bad_table_names.txt - Refer the this txt file what table names to be avoided. bad_column_names.txt - Refer this to be avoided the column name. Also refer the .ftl how they are generated the files.

Reteriving guest premissions for the login portlet

  Some times unknowingly admin  may remove the guest permissions for the login portlet and when we try to access the portlet it says "you do not have permission to view the portlet" . Then we have to retrive back the permisions but portlet is not accessiable  what to do! Here we go , Add the following properties in portal-ext.properties  auto.login.hooks=com.liferay.portal.security.auth.ParameterAutoLogin , Whenever we add parameter in portal-ext.properties we need to resart the server. Access the url as follows  http://localhost:8080/c/portal/login?parameterAutoLoginLogin=yourscreennameOrEmailAddress&parameterAutoLoginPassword=password Retrieve back the permission changes and remove the auto.login.hooks from the portal-ext.properties. Thats it you have done and you will able to see the login portlet

Useful classes in liferay

1. Many we require to split , shorten, replace, matches, contains and many more  to check the string so liferay provided StringUtil.java 2. HTMLUtil .java class is also useful to extract the html and more, this class is useful, have look at this class. 3. StringPool.java class is useful many senerioes.

Liferay boolean query for searching

  By default liferay supports lucene, so how to retrieve entries  Code as follows ,         BooleanQuery fullQuery = BooleanQueryFactoryUtil.create(searchContext);         BooleanQuery searchQuery = BooleanQueryFactoryUtil.create(searchContext);         Searching the blog           searchQuery.addRequiredTerm(Field.ENTRY_CLASS_NAME, BlogsEntry.class.getName());        Adding required terms to search query             searchQuery.addRequiredTerm(Field.ASSET_CATEGORY_IDS, CategoryId);               fullQuery.add(searchQuery, BooleanClauseOccur.MUST);      Adding optional terms where the content should belong to at lease one of these categories            BooleanQuery categoryQuery = BooleanQueryFactoryUtil.create(searchContext);             categoryQuery.addExactTerm(Field.ASSET_CATEGORY_IDS, CategoryId);             fullQuery.add(categoryQuery, BooleanClauseOccur.MUST); Then use fullquery to search blogs SearchContext searchContext =  SearchContextFactory.

Liferay Export & and Import Clear Liferay Cache

I was learning on how to implement the  export and import functionality on Liferay, initially I thought it to be rather a tedious job but thanks to Liferay API/Framework which made my job easier with  Liferay Portlet Data Handlers  thanks to  Jorge Ferrer  who gave me an insight to the API/Framework and how to use the same. All I was required to do is just create a class that extends from BasePortletDataHandler and have it configured via the liferay-portlet.xml But this activity lead to an interesting learning, initially when I implemented this I saw that data was getting exported/imported without any errors but then I see that its not refreshing the UI immediately after the import. This kind of annoyed me for long time .. thanks to  Raymond Auge  for is timely insight that we need to clear the cache for the same to be refreshed.. so started my next task on hunting the class which can do the job.. The initial analysis started with me doing the manual task of clear

Liferay Service Builder with external database

To make a Liferay Service Builder with external database there are some rules to follow. This post will help you to get straight to the point. Keep in mind that: You can’t deploy more than one portlet mapping column with the same entity name, otherwise you get a hot-Deployment error. the names of the portlet name, namespace and database must be distinct (ex. portlet=” imageview “, namespace=” mammography “, database=” dicomviewer “). when you add external jar, you must add them in the Tomcat/lib/ext so liferay can find them in the global classpath. The steps to make the service builder with the external database mapping are: make the service.xml file in the /docroot/WEB-INF/ launch the build-service ant command add the ext-spring.xml file in the /docroot/WEB-INF/src/META-INF/ folder deploy the portlet. The example below might be helpful. —service.xml ———— <?xml version="1.0" encoding="UTF-8" ?> <!DOCTYPE service-builder PUBLIC

Liferay popup

  Pop up with the title ,height, width <script>     function <portlet:namespace/>addpopup(addEntries) { AUI().use('aui-dialog', 'aui-io', 'event', 'event-custom', function(A) { var dialog = new A.Dialog({ title : 'Its is popup', height : 500, width : 580, centered : true, draggable : true, modal : true }).plug(A.Plugin.IO, { uri : addEntries }).render(); dialog.show(); }); } </script> Creating the button , when clicking on button  popup will be highlited <aui:button type="button"  value="Add"            onClick="javascript: <portlet:namespace/> addpopup ('${addEntries}');" > </aui:button> Creating the renderURL in which the page should displayed in the popup <portlet:renderURL var="addEntries"  windowState="<%=LiferayWindowState.EXCLUSIVE.toString()%>"> <portlet:param name=&quo