Posts

Showing posts from June, 2014

How to change the authentication type for login portlet in liferay

Image
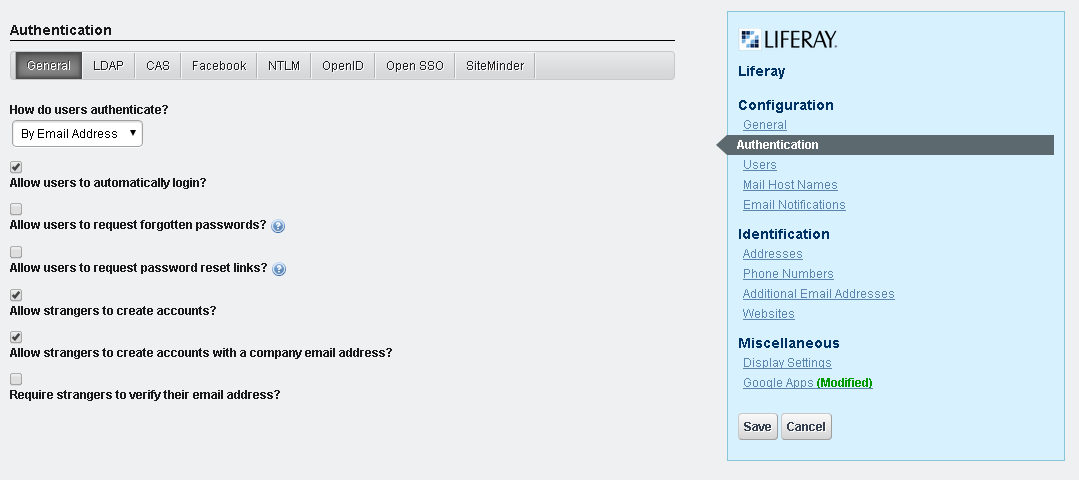
We have 3 options to change the authentication type for login. 1. Go to the controlPanel , navigate to the portal section and click on the portal setting and click on the Authentication right handside as shown in below screen shot.  select the values from the selectbox of " How do users authenticate? " ans click on the save button to save the changes. 2.We can change the properties in the portal-ext.properties as, here i have changed to authenticate by screen name.     #     # The portal can authenticate users based on their email address, screen     # name, or user id.     #     #company.security.auth.type=emailAddress     company.security.auth.type=screenName     #company.security.auth.type=userId 3. Changing the settings of login portlet. Go to page where login portlet is reside and click on the setting icon as shown below. and click on the " configuration " which will navigate to the below screen and then select the authenticatio

Adding the results in the Cache

If we want our results to be in cache, Then we can follow the below procedure as Suppose we take an example, where users to be add in the cache. where name is "ListOfUsers" , key is "Users" and value is getting the all users - UserLocalServiceUtil.getAllUsers(-1,-1). First line is calling the cache called "ListOfUsers". Second line is getting the cache by key "Users". Then the preceding line is , if cache value is null the put the values in the cache. PortalCache cache = MultiVMPoolUtil.getCache("ListOfUsers"); List<user> userList = (List<user>) cache.get("Users"); if(Validator.isNull(userList)) { cache.put("Users",UserLocalServiceUtil.getAllUsers(-1,-1),100); } Here 100 refers to the no.of seconds the results to be in the cache. After 100 seconds cache will be cleared.

IPC which to be prefer : Public Render Parameters or Events

Internal Portlet Communication can be done in 2 ways, 1.Using Public Render Parameter 2.Using Events Public Render Parameter : Liferay The way tagcloud and Blog communicates. Using Public Render Parameter way we can pass only string Using Events we can transfer any serializable objects So using Events is the recommended way with jsr286.

Creating the User Group and assigning the roles for the user group

1.Creating the UserGroup: We can get the userId and companyId from themeDisplay.      UserGroup userGrp = UserGroupLocalServiceUtil.addUserGroup(userId, companyId, "Test User Group", "Test User Group Desc"); 2.Assiging the user to UserGroup: Here we can assign group of users but as of now we are assigning the only one user. UserLocalServiceUtil.addUserGroupUsers(userGrp.getUserGroupId(), new long []{userId}); 3.Assiging the roles to the usergroups:            Here we are getting the groupId of the UserGroup and also the role long groupId =userGrp.getGroup().getGroupId() Role roleId = RoleLocalServiceUtil.getRole(companyId, "Power User"); RoleLocalServiceUtil.addGroupRole(groupId, roleId);

Adding address for Organization

Image
1.Adding Address List<ListType> addressTypes = ListTypeServiceUtil.getListTypes(Organization.class.getName()+ ListTypeConstants.ADDRESS); Here retrieving the all the address for the organization. Below screen is the available address for the organization. ( 1.Billing, 2.Other, 3.P.O.Box, 4.Shipping ) .Hence " addressTypes " contains all these address As an example we will add address as "Billing" type. so we will iterate all for the listtypes to get Billing type. for (ListType addressType : addressTypes) { String addressTypeName = addressType.getName(); if(addressTypeName.equalsIgnoreCase("Billing")) { personalAddressTypeId = addressType.getListTypeId(); } } Then adding the adddress AddressLocalServiceUtil.addAddress(userId, Organization.class.getName(), organization.getOrganizationId(), street1, street2, street3, city, zip,regionId, countryId, personalAddressTypeId, true, true); Here we need to add the country and region also,