Posts

Showing posts from August, 2013

Refreshing the portlet through the javascript

Some times it may require our portlet when some action performed. We can refresh liferay portlet through the javascript. <script type="text/javascript"> jQuery(document).ready(function() {           Liferay.Portlet.refresh('#p_p_id_ testjson_WAR_testjson _'); } </script> Bold word is the portlet name
Creation of URL in class

Some times it may require you to create url in class. Its quite easy task to do , Here you follow as , ThemeDisplay themeDisplay = (ThemeDisplay) actionRequest. getAttribute(WebKeys.THEME_DISPLAY); long plid = PortalUtil.getPlidFromPortletId(themeDisplay.getScopeGroupId(),<portlet-name>);          PortletURL portletURL = PortletURLFactoryUtil.create(actionRequest ,<portlet-name>, plid ,PortletRequest.RENDER_PHASE);          portletURL.setWindowState(LiferayWindowState.POP_UP);          portletURL.setPortletMode(LiferayPortletMode.VIEW);          portletURL.setProperty("portletName", <portlet-name>);          portletURL.setParameter("type", "add"); For Custom portlet name will be some thing as like this <name>_WAR_<name>

Hiding the portlet

In some seceniros you may need to hide the portlet, In liferay it is easy as just add the attribute. renderRequest.setAttribute(WebKeys.PORTLET_CONFIGURATOR_VISIBILITY, false); That it !!! Above renderRequest  will set  in hiding 

Accessing JSON through javascript in custom portlet

Image
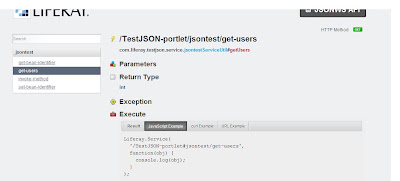
Scenrio:           Accessing the other custom portlet JSON services in our custom portlet through the javascript. Step:1 Enable remote-servie = true in service.xml as shown and build service to generate the services <service-builder package-path="com.liferay.testjson"> <namespace>custom</namespace>          <entity name="jsontest" remote-service="true" local-service="true" uuid="true">                      <column name="id" type="int" primary="true" />                       <column name="name" type="String"></column>                     <column name="desc" type="String"></column>     </entity>   </service-builder> Step2:   Open the class XXXXServiceImpl.class and write a method that you want to access in other portlet.   Here i have written getUsers method to reteive the cou

Focusing the form field in Liferay

  Whenever we create from in liferay ,it is required cursor to focus on the first field.   Suppose we can have form like this   <aui:from name="fm" method="post" action="${updateActionURL}">             <aui:input  name="title" label = "Title"/>        <aui:input  name="desc" label = "Desc"/>       <aui:button type="submit" value ="save"/> <.aui:form>  If we think title should be highlited on page load , following script is also required. <aui:script> Liferay.Util.focusFormField(document.<portlet:namespace/>fm.<portlet:namespace/>title); </aui:script> Deploy your project and refresh your page . We can see the first field is highlighted. These source are avaliable in the follwing path.       portal-web/docroot/html/js/liferay

Success message and Error message in liferay

Success Message                   In Class                           SessionMessages.add(request, "record-updated");                In JSP                           <liferay-ui:success key="record-updated" message="record-updated-sucessfully" />                Language.properties                            record-updated  = Your record updated successfully.            and also don't forget add following tag in portlet.xml after supports tag                           <resource-bundle>content/Language</resource-bundle>  Error Message            In Class                   SessionErrors.add(request,"cannot-delete-record");                In JSP                 <liferay-ui:error key="cannot-delete-record">                            <liferay-ui:message key=cannot-delete-this -record" />                </liferay-ui:error>                Language.properties          

Submitting the form with ajax(using alloy UI) i.e with out page refresh

    In rare it may happens, you have to submit the form with out refresh the page (actionURL ) and save the parameters in the DB.    Jus Copy the below code , Here i am using alloy UI to submit the form and here not need to append any parametrs to the URL .you will get the parameters values from request parameters. <portlet:actionURL var="formsubmissionURL" /> <aui:script use="aui-io-request,aui-node" > Liferay.provide(window,'submitForm', function() { var A = AUI(); A.io.request('${formsubmissionURL}',{ method: 'POST', form: { id: '<portlet:namespace />fm' }, on: { success: function(){     }   }   });   }); </aui:script > <aui:form action="#" method="POST" id="fm" name="fm" >      <aui:input type="text" name="name"/>      <aui:button type="submit" value="Save" /&

Sending mail in liferay

 In most of your project you may come across sending an mail to the user when ever updated. In liferay its pretty easy to do with that        InternetAddress fromAddress = new InternetAddress(user.getEmailAddress()) // from address         InternetAddress toAddress = new InternetAddress(user.getEmailAddress())  // to address             String body = ContentUtil.get("/templates/sample.tmpl", true);  // email body , here we are getting email structure creating the content folder in the src and create the file with the extension as tmpl . Here i have created a folder called content and also created file as sample.tmpl             String subject = "subject" // email subject                         body = StringUtil.replace(body, new String []{"[$NAME$]","[$DESC$]"}, new String []{"Name","Description"}); // replacing the body with our content.             MailMessage mailMessage = new MailMessage();             m

Creating scheduler in Liferay

  To create scheduler in liferay is easy just adding an entry in liferay-portal.xml and adding your custom logic in do receive method. 1.Add the following entry in liferay-portlet.xml after icon tag and before instansable tag.    " <scheduler-description> " tag you can give your custom description   " <scheduler-event-listener-class> " tag write your custom class where you write your custom scheduler  logic. " cron trigger class " tag , it identifies at what scheduler runs , here scheduler runs at 12 clock at sunday.             <scheduler-entry>            <scheduler-description>scheduler entry</scheduler-description>              <scheduler-event-listener-class>                 com.sample.scheduler.SchedulerClass             </scheduler-event-listener-class>            <trigger>               <cron>                 <cron-trigger-value>0 0 12 ? * SUN *</cron-trigger-value&

Hiding or Disabling the default sucess message

 By default in liferay, Whenever you submit form you will have default message as " Your request is proceed Successfully " How to disable it? There are 2 steps Step 1:    Just add below in portlet.xml before "excripation-cache" add-process-action-success-action false Step 2: Add the below code in the class level of a method SessionMessages.add(portletRequest,PortalUtil.getPortletId(portletRequest) +SessionMessages.KEY_SUFFIX_HIDE_DEFAULT_SUCCESS_MESSAGE); For Reference look into the PortletAction class of hideDefaultSuccessMessage method

Parsing in Liferay(Using SAX Parser reader)

  Liferay provided default classes to parse the xml content.   Have look at this SAXReaderUtil  which will be useful to parse the xml.   For Example:     Consider the WebContent(Journal article) where we have added metadata ,consider to fetch it.    First of all this metadata content will be store in Journal article table of Content column as <?xml version="1.0"?> <root available-locales="en_US" default-locale="en_US">    <dynamic-element instance-id="trtrtrt454" name="Title" type="text" index-type="">         <dynamic-content><![CDATA[Test Title]]></dynamic-content>     </dynamic-element>         <dynamic-element instance-id="Adgbcd456" name="Desc" type="text" index-type="">         <dynamic-content><![CDATA[Test Desc]]></dynamic-content>     </dynamic-element>     </root>

service bulider(service.xml) column types

When ever your are writing the service.xml , you may have doubts what type the liferay supports. Here we go,   Take look at the servicebulider class and method getSqlType(-,-,-) . So whenever you have to define data Type have a glance at this class.  Refer the " com.liferay.portal.tools.servicebuilder.dependencies " package what columns , Tables will allowed to add in the service.xml. bad_table_names.txt - Refer the this txt file what table names to be avoided. bad_column_names.txt - Refer this to be avoided the column name. Also refer the .ftl how they are generated the files.

Reteriving guest premissions for the login portlet

  Some times unknowingly admin  may remove the guest permissions for the login portlet and when we try to access the portlet it says "you do not have permission to view the portlet" . Then we have to retrive back the permisions but portlet is not accessiable  what to do! Here we go , Add the following properties in portal-ext.properties  auto.login.hooks=com.liferay.portal.security.auth.ParameterAutoLogin , Whenever we add parameter in portal-ext.properties we need to resart the server. Access the url as follows  http://localhost:8080/c/portal/login?parameterAutoLoginLogin=yourscreennameOrEmailAddress&parameterAutoLoginPassword=password Retrieve back the permission changes and remove the auto.login.hooks from the portal-ext.properties. Thats it you have done and you will able to see the login portlet

Useful classes in liferay

1. Many we require to split , shorten, replace, matches, contains and many more  to check the string so liferay provided StringUtil.java 2. HTMLUtil .java class is also useful to extract the html and more, this class is useful, have look at this class. 3. StringPool.java class is useful many senerioes.

Liferay boolean query for searching

  By default liferay supports lucene, so how to retrieve entries  Code as follows ,         BooleanQuery fullQuery = BooleanQueryFactoryUtil.create(searchContext);         BooleanQuery searchQuery = BooleanQueryFactoryUtil.create(searchContext);         Searching the blog           searchQuery.addRequiredTerm(Field.ENTRY_CLASS_NAME, BlogsEntry.class.getName());        Adding required terms to search query             searchQuery.addRequiredTerm(Field.ASSET_CATEGORY_IDS, CategoryId);               fullQuery.add(searchQuery, BooleanClauseOccur.MUST);      Adding optional terms where the content should belong to at lease one of these categories            BooleanQuery categoryQuery = BooleanQueryFactoryUtil.create(searchContext);             categoryQuery.addExactTerm(Field.ASSET_CATEGORY_IDS, CategoryId);             fullQuery.add(categoryQuery, BooleanClauseOccur.MUST); Then use fullquery to search blogs SearchContext searchContext =  SearchContextFactory.