Posts

Showing posts from 2014

Supported properties in hook by liferay

In Liferay we know that we can override some of the properties using hooks. To remember all those supported properties is quite difficult. Also how can we know  whether that particular properties  is supported or not ? So we have class called  HookHotDeployListener class to check the supported properties. Look into the  SUPPORTED_PROPERTIES string array variable where it listed all the supported properties. This is how it is listed public class HookHotDeployListener extends BaseHotDeployListener implements PropsKeys { public static final String[] SUPPORTED_PROPERTIES = { "admin.default.group.names", "admin.default.role.names", "admin.default.user.group.names", "asset.publisher.asset.entry.query.processors", "asset.publisher.display.styles", "asset.publisher.query.form.configuration", "auth.forward.by.last.path", "auth.public.paths", "auth.verifier.pipeline", "auto.deploy.liste...

How liferay is identifying the database configuration

In liferay we configure the database configuration properties in the portal-ext.properties. So when we restart the server or during server startup , we can see the log as  Determine dialect for MYSQL5 or if it is orcale  Determine dialect for oracle 11g . so how liferay is identifying? In Liferay have a look in to the  DialectDetector class and the method  getDialect(DataSource dataSource) . Look into the following code in the method. Connection connection = dataSource.getConnection(); DatabaseMetaData databaseMetaData = connection.getMetaData(); String dbName = databaseMetaData.getDatabaseProductName(); int dbMajorVersion = databaseMetaData.getDatabaseMajorVersion(); dialectKey = dbName.concat(StringPool.COLON).concat( String.valueOf(dbMajorVersion)); dialect = _dialects.get(dialectKey); if (_log.isInfoEnabled()) { _log.info("Determine dialect for " + dbName + " " + dbMajorVersion); } else if (dbName.startsWith("Oracle") &...

Generating the thread dumps

Image
Liferay has feature to generate thread dumps if request takes more than 5 minutes. So that we can anayalze which thread it taking more time. Search and look into these following properties in the portal.propeties.      #     # The thread dump filter will automatically log thread dumps when the portal     # is too slow. Behavior can be configured via the property     # "thread.dump.speed.threshold".     #     com.liferay.portal.servlet.filters.threaddump.ThreadDumpFilter=true     #     # The thread dump filter will log a thread dump if the portal takes longer     # than the specified number of seconds to process. The thread dump filter     # must be enabled via the property     # "com.liferay.portal.servlet.filters.threaddump.ThreadDumpFilter".     #     thread.dump.speed.threshold=5 Also we have another option to generate the thre...

Auditing the sucessful logged-in users in liferay

In Liferay we have some events to like application startup, global events, login events and many more. If we want to audit the login user on which IP address he logged-in in liferay we have events like 1.login.events.pre 2.login.events.post login.events.pre : Which Executes Before Login Action. login.events.post: Which Excutes After Login. we want to track the user login on which IP Address used so we will write the login.events.post which will be execute after login completes. In Portal.Properties login.events.post = com.sample.hook.LoginSuccessAudit. Create a class called LoginSuccessAudit public class LoginSuccessAudit extends Action { @Override public void run(HttpServletRequest request, HttpServletResponse response) throws ActionException {                    User user = PortalUtil.getUser(request);                    System.out.println("IP Address ...

Audting the Login Failure in liferay

In Liferay we can audit login failure for the user just by writing the hook. We have property which we need to add in portal.properties file as.        auth.failure = com.sample.events.hook.LoginFailureAudit. Then create a class and extend with the AuthFailure public class LoginFailureAudit implements AuthFailure {      public void onFailureByEmailAddress(long companyId, String emailAddress, Map<String, String[]> headerMap, Map<String, String[]> parameterMap) throws AuthException { long userId = UserLocalServiceUtil.getUserByScreenName(companyId, emailAddress).getUserId(); User user = UserLocalServiceUtil.getUser(userId); System.out.println("login failure attempts are"+user.getFailedLoginAttempts()); } public void onFailureByScreenName(long companyId, String screenName, Map<String, String[]> headerMap, Map<String, String[]> parameterMap) throws AuthException { long userId = UserLocalServiceUtil.g...

Refreshing the portlet at certain intervals in liferay

In our Project we have requirement to refresh the portlet at certain interval of times. Thanks to liferay we have utility method to get the refreshURL. Have a look into the  PortletURLUtil class. we have  getRefreshURL (---....)  method to the current portlet URL. So we have used in the following way in the jsp. As already we know "request" and "themeDisplay" Objects are predefined objects. <%@page import="com.liferay.portlet.PortletURLUtil"%> <script type="text/javascript"> setTimeout(openUrl, 5000); // Wait 5 seconds function openUrl(){    window.open('<%=PortletURLUtil.getRefreshURL(request, themeDisplay) %>'); } </script> Thats it will refresh the portlet for every 5 seconds. In  PortletURLUtil   also we have one more method to clone the URL,  clone (----) public static PortletURL clone( PortletURL portletURL, MimeResponse mimeResponse) throws PortletException { ---- --- } ...

Viewing the SQL Query in liferay : debugging the SQL Query in Hibernate

Sometimes we have to know SQL query hiting in DB to retrieve the list. Suppose When we are writing the DynamicQuery , Some times we have to know SQL query it is generating to hit DB. So generally it is useful when we are debugging the Query it is generated. In hibernate we used the write the property in XML file as hibernate.show.sql to view the query. In Liferay also we can also set the below property to true in the portal-ext.properties to view the SQL query at the console. hibernate.show_sql=true. By adding the above property it will just reterive the parameters. What if we want to display the parameters. Add the below properties in log4j.properties it will display the paramters also. # logs the SQL statements #log4j.logger.org.hibernate.SQL=debug # Logs the JDBC parameters passed to a query #log4j.logger.org.hibernate.type=trace In Liferay log4j is located in the below location tomcat-7.0.42\webapps\ROOT\WEB-INF\classes Also we want t...

Reindex the documents

Whenever we are using the lucene search, sometimes content is not able to search even it is present. so we need to reindex the content in the control panel of the server adminstration. We have one more option, when we add the below property it will index the content during the server startup, so manually it is not required to reindex the content in the control panel. So add the below property in the "portal-ext.properties". so it will index during the startup.       # Set this to true if you want to index your entire library of files on     # startup. This property is available so that automated test environments     # index on startup. Do not set this to true on production systems or else     # your index will be indexed on every startup.     #     index.on.startup=true.

Viewing the lucene index files in liferay

Image
By default liferay will index the files. But by default we cannot view the index files . So if we want to view the index files flow the below steps. So the default position of the index are <tomcat-installation>\data\lucene . To view the files we need install the jar in the following location http://code.google.com/p/luke/downloads/detail?name=lukeall-4.0.0-ALPHA.jar file called " lukeall-4.0.0-ALPHA.jar ". After installation go the installation folder copy the path and open the command prompt and hit the following URL as following image. It will open the following Screen shot GUI as, In the Browse option select the location of the lucene and check the checkbox (Force unlock,if locked). In My local system location of the lucene index files are <tomcat-installation>\data\lucene\10154 . Click OK, then we can view the index files as below screen. So here we can view the index files, which were liferay is indexed. Also we choose another ...

Creating the scheduler dynamically in liferay

We can create the scheduler by defining the entries in the liferay-portlet.xml with specfying the only particular entries. what if scheduler what to change based on the user input. so here is the code, String cron = "0 0/1 * 1/1 * ? *"; Portlet portlet = PortletLocalServiceUtil.getPortletById("new_WAR_UserSearchportlet"); Trigger trigger = null; try { trigger = TriggerFactoryUtil.buildTrigger(TriggerType.CRON, Scheduler.class.getName(), Scheduler.class.getName(), new Date(), null, cron); } catch (SchedulerException e) { e.printStackTrace(); } Message message = new Message(); message.put(SchedulerEngine.CONTEXT_PATH, portlet.getContextPath()); message.put(SchedulerEngine.MESSAGE_LISTENER_CLASS_NAME, Scheduler.class.getName()); message.put(SchedulerEngine.PORTLET_ID, portlet.getPortletId()); try { SchedulerEngineUtil.schedule(trigger, StorageType.PERSISTED, "", "liferay/scheduler_dispatch", mes...

How to change the authentication type for login portlet in liferay

Image
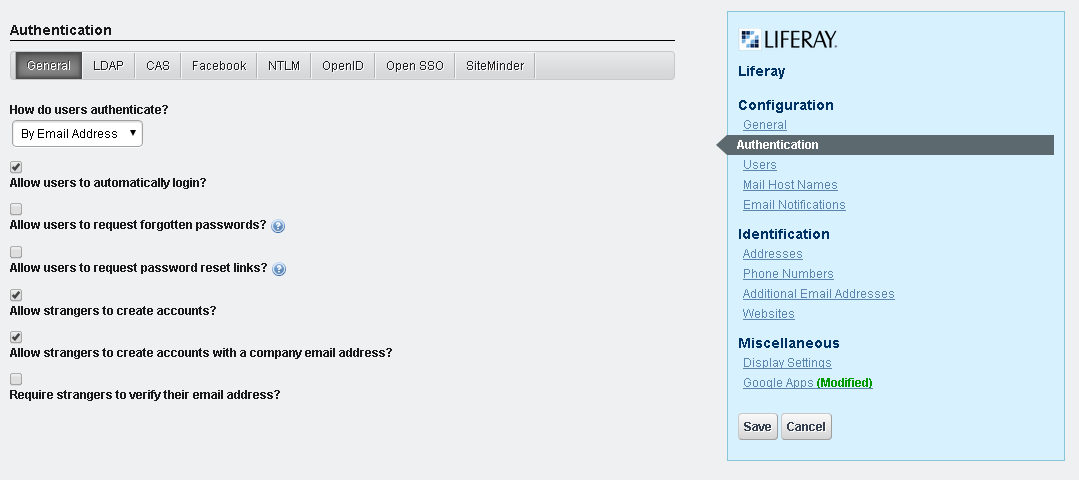
We have 3 options to change the authentication type for login. 1. Go to the controlPanel , navigate to the portal section and click on the portal setting and click on the Authentication right handside as shown in below screen shot.  select the values from the selectbox of " How do users authenticate? " ans click on the save button to save the changes. 2.We can change the properties in the portal-ext.properties as, here i have changed to authenticate by screen name.     #     # The portal can authenticate users based on their email address, screen     # name, or user id.     #     #company.security.auth.type=emailAddress     company.security.auth.type=screenName     #company.security.auth.type=userId 3. Changing the settings of login portlet. Go to page where login portlet is reside and click on the setting icon as shown below. and click on the " configuration " which will nav...

Adding the results in the Cache

If we want our results to be in cache, Then we can follow the below procedure as Suppose we take an example, where users to be add in the cache. where name is "ListOfUsers" , key is "Users" and value is getting the all users - UserLocalServiceUtil.getAllUsers(-1,-1). First line is calling the cache called "ListOfUsers". Second line is getting the cache by key "Users". Then the preceding line is , if cache value is null the put the values in the cache. PortalCache cache = MultiVMPoolUtil.getCache("ListOfUsers"); List<user> userList = (List<user>) cache.get("Users"); if(Validator.isNull(userList)) { cache.put("Users",UserLocalServiceUtil.getAllUsers(-1,-1),100); } Here 100 refers to the no.of seconds the results to be in the cache. After 100 seconds cache will be cleared.

IPC which to be prefer : Public Render Parameters or Events

Internal Portlet Communication can be done in 2 ways, 1.Using Public Render Parameter 2.Using Events Public Render Parameter : Liferay The way tagcloud and Blog communicates. Using Public Render Parameter way we can pass only string Using Events we can transfer any serializable objects So using Events is the recommended way with jsr286.

Creating the User Group and assigning the roles for the user group

1.Creating the UserGroup: We can get the userId and companyId from themeDisplay.      UserGroup userGrp = UserGroupLocalServiceUtil.addUserGroup(userId, companyId, "Test User Group", "Test User Group Desc"); 2.Assiging the user to UserGroup: Here we can assign group of users but as of now we are assigning the only one user. UserLocalServiceUtil.addUserGroupUsers(userGrp.getUserGroupId(), new long []{userId}); 3.Assiging the roles to the usergroups:            Here we are getting the groupId of the UserGroup and also the role long groupId =userGrp.getGroup().getGroupId() Role roleId = RoleLocalServiceUtil.getRole(companyId, "Power User"); RoleLocalServiceUtil.addGroupRole(groupId, roleId);

Adding address for Organization

Image
1.Adding Address List<ListType> addressTypes = ListTypeServiceUtil.getListTypes(Organization.class.getName()+ ListTypeConstants.ADDRESS); Here retrieving the all the address for the organization. Below screen is the available address for the organization. ( 1.Billing, 2.Other, 3.P.O.Box, 4.Shipping ) .Hence " addressTypes " contains all these address As an example we will add address as "Billing" type. so we will iterate all for the listtypes to get Billing type. for (ListType addressType : addressTypes) { String addressTypeName = addressType.getName(); if(addressTypeName.equalsIgnoreCase("Billing")) { personalAddressTypeId = addressType.getListTypeId(); } } Then adding the adddress AddressLocalServiceUtil.addAddress(userId, Organization.class.getName(), organization.getOrganizationId(), street1, street2, street3, city, zip,regionId, countryId, personalAddressTypeId, true, true); Here we need to add the country and region also,...

Points to remember when we write the custom login portlet

Suppose you need to create the custom login portlet, which does not satisfy the default liferay's login portlet. then you need to update the following properties in the portal-ext.properties. 1. If your portlet name is "Custom login" then you need to update this property      auth.login.portlet.name= Custom login. 2. Also we need to mention the Page name(friendly URL) where this login portlet resides.      auth.login.url=/web/guest/ login

Tranaction in Liferay

Following content is Pasted from the below url http://www.liferayaddicts.net/blogs/-/blogs/transaction-management-with-liferay-service Following are the important points that a Liferay Architect must make note of in order to work with Transactions in Liferay The entry point to transaction (start of transaction boundary) in Liferay service is the <Entity>LocalServiceImpl class. Hence, while firing DML oriented methods like update, insert and delete on X Entity from Y do not use make calls to XLocalServiceUtil or XLocalService as this will result in two transaction boundaries - one for entity X and the other for entity Y. Relate the two entities through service.xml file (one to many or many to many based on your domain model) or else refer one entity in the other using <reference... in service.xml file. For e.g. if you want to make call on X entity from YLocalServiceImpl then in service.xml file while configuring Y Entity put <reference entity="X" package...

Difference between InnoDB and MyISAM in MySQL?

InnoDB : is a storage engine for MySQL. MyISAM : is the default storage engine for the MySQL relational database management system versions prior to 5.5 1. The major deficiency of MyISAM is the absence of transactions support . Versions of MySQL 5.5 and greater have switched to the InnoDB engine to ensure referential integrity constraints, and higher concurrency. Ensure that your database supports transactions; yes ! this is needless to say but then if you are using MySQL, the database engine other MyISAM does not support transactions. You must use InnoDB as the database engine for your tables.

sanitizers in liferay

Liferay Uses Stanitizers to escape the XSS elements In Portal-model-hints.xml for blog title <sanitize content-type="text/plain" modes="ALL" /> In Portal.properties sanitizer.impl=com.liferay.portal.sanitizer.DummySanitizerImpl Following Links which explains how to use it 1.http://www.liferay.com/community/forums/-/message_boards/message/12668382 2.https://www.liferay.com/web/juan.fernandez/blog/-/blogs/sanitizers-in-liferay-6 We need antiSamy hook to deploy , to work as excepted.

Checking weather the user has the role Organization Administrator.

Whenever we are creating the Organization we can assign the user to the Organization also we can assign the Organization role to the User. As of now we have 2 roles. 1.Organization Owner. 2. Organization Administrator. User who created the Organization will have the role "Organization Owner". But we need to manually assign the "Organization Administrator" to the user. In programmatically to check weather user has roles or not here is the code. ThemeDisplay  themeDisplay = (ThemeDisplay)actionRequest.getAttribute(WebKeys.THEME_DISPLAY); try {         Role role = RoleLocalServiceUtil.getRole(themeDisplay.getCompanyId(),RoleConstants.ORGANIZATION_ADMINISTRATOR);  //Get the Role List<UserGroupRole> userGroupList = UserGroupRoleLocalServiceUtil.getUserGroupRoles(themeDisplay.getUserId()); //Getting the Roles of the User for(UserGroupRole userGroupRole :userGroupList) { //Iterating the loop      if...

Checking the Weather user has userdelete Permission or not.

First of all we need the permission checker we can get it from the themedisplay . PermissionChecker permissionChecker = themeDisplay.getPermissionChecker();  boolean deleteStatus  = false; try { Getting the all the Role of the User List<Role> roleList = RoleLocalServiceUtil.getUserRoles(themeDisplay.getUserId());     for(Role role : roleList) { Iterating the all the roles of the user           if(permissionChecker.hasPermission(themeDisplay.getScopeGroupId(), User.class.getName(),                          role.getRoleId(), ActionKeys.DELETE)) {            deleteStatus = true;         System.out.println("roleId"+role.getName());          }     } } catch (SystemException e) {           e.printStackTrace(); }

Ajax Implementation in the Liferay

Creating the Resource URL Liferay's default uses the resource url for ajax requests          <portlet:resourceURL id="addResource" var="addResourceURL">         </portlet:resourceURL> Creating the Ajax function creating the Jquery  ajax function function <portlet:namespace/>getEntries(){                 var url = "${addResourceURL}";                         $.ajax({                                 type : "POST",                                 url : url,                                 dataType : "JSON",                 ...

Assigning and Unassigning user to the userGroup

Assinging users to the userGroups .       UserLocalServiceUtil.addUserGroupUsers(userGroupId, addUserIds); Removing users from the UserGroups.       UserLocalServiceUtil.unsetUserGroupUsers(userGroupId, removeUserIds);

Converting the Hits into the UserList

 By default liferay indexes the content and So when ever we are searching the any content in the liferay, It reterives from the index. Suppose we think we need search the Users which we need to implement programmatically. Liferay has one utility function which search the user and returns in the form of a Hits. Hits hits = UserLocalServiceUtil.search(-,-,-,-,-,-,-,-,-,-,-,); So how can convert the hits into UserList.  Here the code. public List<User> getUserList(Hits hits) throws PortalException, SystemException {   List<Document> documents = hits.toList(); // Converting the Hits into the Documents List<User> userList = new ArrayList<User>();         for (Document document : documents) {                 long userId = GetterUtil.getLong(document.get(Field.USER_ID)); // Getting the Individual User by userId.             ...

Getting the search container checkbox values in the Liferay

In liferay if we see the search container they have the chexkboxes which default liferay creates. So how do we reterive the those checkbox values in the javascript? Here is the code to retrieve the chexkbox values in javascript. Liferay.provide( window, '<portlet:namespace />updateStatus',  // Name of the javascript function . function(cmd) {       var updateStatus = true;        var updateUserIds = Liferay.Util.listCheckedExcept(document.<portlet:namespace />fm, "<portlet:namespace />allRowIds");  // Getting the checked checkboxes values , Here "fm" is the form name .       if (!updateUserIds) {            updateStatus = false;       } // Here based on the user click we are displaying the message . else if (cmd == "deActive") {      if (!confirm('<%= UnicodeLanguageUtil.get(pageContext, "are-you-sure-you-want-to-deac...

Deleting the user and Changing the status : Active and Deactive of the user

Here is the following code to delete the user and change the status of the user In Liferay After deactivating the user then only we can delete the user. It is the below code what liferay is using to delete and update the status of the user.  protected void deleteUsers(ActionRequest actionRequest) throws Exception {              String cmd = ParamUtil.getString(actionRequest, Constants.CMD);              // Getting the List of all the Users              long[] deleteUserIds = StringUtil.split(ParamUtil.getString(actionRequest, "deleteUserIds"), 0L);              // Based on the user status selected we are changing the status              for (long deleteUserId : deleteUserIds) {                        if (cmd.equals(Constants.DEACTIV...

Hiding the Default Error message

Image
In the Liferay, when ever we get the exception by default  error message will be displayed. So how to remove that message as below? Just add the below code at the class level where your excepting the error can occur. Code as follows as SessionMessages.add(actionRequest, (LiferayPortletConfig)portletConfig.getPortletName() + SessionMessages. KEY_SUFFIX_HIDE_DEFAULT_ERROR_MESSAGE); Thats it , we have disabled the default error message. Anyhow we are discussing about the error message, here we will discuss how to create the error message, Creating the Error message in the Liferay . In Class : SessionErrors.add(actionRequest, "error-key"); In JSP: <%@ taglib uri="http://liferay.com/tld/ui" prefix="liferay-ui" %> <liferay-ui:error key="error-key">        <liferay-ui:message key="validation-perference-exception" /> </liferay-ui:error>

Adding the custom field for the OOTB using the expando

Suppose if we think to add the custom field to the organization while creating the organization. here is the following code. Organization organization = null;  ThemeDisplay themeDisplay  =  (ThemeDisplay) renderRequest. getAttribute (WebKeys.THEME_DISPLAY);                 long userId = themeDisplay.getUserId();                                try {                      int statusId = ListTypeConstants.ORGANIZATION_STATUS_DEFAULT;                     ServiceContext serviceContext = ServiceContextFactory. getInstance (Organization.class.getName(), renderRequest);                                                 Map<...

Creating the Custom field for the portlet

Creating the customfield in the custom portlet 1. Create the class and extend with BaseCustomAttributesDisplay . 2. Make an entry in liferay-portal.xml  with tag as (custom-attribute-display) by defining the class    Thats it now the entry will be available to add the custom field in  the control panel. Go to the control Panel and click on the custom field. You can see the our portlet custom field value avaliable there.     Click on the Edit link and add the field name and select field type  from the dropdown and also edit the permission to view for the user. Now your custom field avaliable to add in the portlet. 3.       To display the  custom attributes in the jsp as editable keep  editable as "true" if not "false" , like below         <liferay-ui:custom-attributes-available className="<%= Article.class.getName() %>">   ...

Extracting/Reading the CSV file and TXT file and Writing the data into CSV file

Exacting the CSV file. String exactedFile = "D:\\Temp\\test.csv"; CSVReader csvReader = new CSVReader(new FileReader( exactedFile ));  // Reading the CSV file . String[] row = null; while((row = csvReader.readNext()) != null) { // Reading the individual line                                                            row[0] // printing the first cell.                                  row[1] // printing the second cell.                           } We need to add  opencsv-1.7.jar in the class path. import au.com.bytecode.opencsv.CSVReader; Reading the TXT file. final String file1 = "D:\\Temp\\creds.txt"; BufferedReader br = null; String sCurre...

Creating Scheduler in liferay - creating the scheduler dynamically based on the user inputs

As we know creating the static scheduler  is very easy as we  defined in the following url as    http://liferaytutorial.blogspot.com/2013/08/creating-scheduler-in-liferay.html Sometimes it may require to create dynamic schedule. Liferay had some created predefined class. Scheduling : In Messageboard portlet , Take a look at the MBMailingListLocalServiceImpl of  " protected void scheduleMailingList(MBMailingList mailingList) " method               Calendar startDate = CalendarFactoryUtil.getCalendar(); CronText cronText = new CronText(startDate, CronText.MINUTELY_FREQUENCY, mailingList.getInReadInterval()); Trigger trigger = new CronTrigger(groupName, groupName, startDate.getTime(), null, cronText.toString());                 SchedulerEngineUtil.schedule( trigger , StorageType.MEMORY_CLUSTERED, null, DestinationNames.MESSAGE_BOARDS_MAILING_LIST, mailingLi...

Creating tabs in liferay

In Liferay creating tab is very easy task. In our jsp , example as view.jsp <%@taglib uri="http://liferay.com/tld/ui" prefix="liferay-ui"%> <% String tabValue = ParamUtil.getString(request, " tab ", "help"); String tabsURL = "/html/jsp/" + tabValue.trim() + ".jsp"; String names = "HELP,PREVIEW,PRINT"; String tabsValues = "help,preview,print"; %>     <portlet:renderURL var="url" />     <liferay-ui:tabs names="<%=names%>" tabsValues="<%=tabsValues%>" param=" tab " url="${url}"  />     <c:import url="<%=tabsURL%>" /> Here " /html/jsp/ " is the folder of the jsps where it resides. You can give your own name. Here we have given param name as tab . so we are reterving the parameter value in tab. In your class no logic will reside as sample as below         @Over...

Accessing the image from theme

Some times it may requires to access the image from the theme. So here we go, view.jsp <%@taglib uri="http://liferay.com/tld/theme" prefix="liferay-theme" %> <liferay-theme:defineObjects/> <img src="${ themeDisplay.getPathThemeImages() }/info.png" /> Here  themeDisplay.getPathThemeImages() gets the default image path as (< your theme name> /images ) If you create a custom folder in images folder then you have to give folder name after the  themeDisplay.getPathThemeImages().

Embedding the Web content or journal article in a portlet

Image
We can insert the webcontent in a custom portlet. 1. Create the New webcontent - click on the Add button select the basic web content . Enter some dummy data and click on the save to save the changes. After creation of the webcontent it generates the articleId as shown below. Use this tag to generate the webcontent <liferay-ui:journal-article articleId="113701" groupId="<%=themeDisplay.getScopeGroupId() %>"></liferay-ui:journal-article>

Defining the Configuration in setting

Image
In Liferay Core portlets you can see the portlet in setting tab as Add the following entry in the liferay-portlet.xml after icon tag as                    <configuration-action-class>                              com.liferay.portal.kernel.portlet.DefaultConfigurationAction                 </configuration-action-class> and define the following in the portlet.xml as     <init-param> <name>config-template</name> <value>/html/test/config.jsp</value> </init-param> In Config.jsp If you want to save the entries in the preferences  it is very simple <liferay-portlet:actionURL var="configURL" portletConfiguration = "true"/>     <aui:form action="${configURL}">          1. ...

Setting edit mode - Perference

Image
We can enable edit mode for a portlet by setting the init param in portlet.xml <init-param>      <name>edit-template</name>      <value>/html/jsp/edit.jsp</value> </init-param> Create edit.jsp(name can be anything)  . Then you can see the following image in the setting. When we click on the preference by default the following method executes. public void doEdit( RenderRequest renderRequest, RenderResponse renderResponse) throws IOException, PortletException { ---------------- ------------------- }

Adding and getting init parameters

We will be adding the init parameters in the portal.xml as         <init-param>              <name>Height</name>              <value>200</value>         </init-param> String name = getInitParameter("Height"); //200 Enumeration<String> names = getInitparameterNames(); // It gives the all init parameters In JSP         portletConfig.getInitParameter("Height");